Thursday, January 31, 2013
DIY Valentine's Day Pillow Case
Materials:
Down below I have and amazing video show you have to make this gorgeous and fast pillow case. This video was posted on YouTube by Anne also known as anneorshine. She has amazing DIYS on her channel so definitely check her out. When I first tried out this DIY I was so

Friday, January 25, 2013
Valentines Day Outfits.

thinking about what to wear, that's okay because I'm here to help. All of these outfits are more settle with colors, mostly pestle pinks than bright red and hot pink.
Outfit #1: The first is outfit is the most casual, but still cute. On Valentine's Day if you are just hanging out with some friends going shopping this is perfect, because this outfit is very comfy and casual. The white graphic tee with the black heart works really well with the pastel pink color denims. Also color denim are very trendy now. I pair this outfit with some brown combats, because the outfit would look more laded back the casual. Also the combat boots are super comfy. Since this outfit is more casual, I decided to finish it off with a cream colored Longchamp tote bag.
Outfit #2: The second outfit would be a great day outfit. You have a sheer pastel pink collared button-up blouse with really pretty gold studs on the collar. For pants I chose these metallic gold colored jeans, they bring out the color of the studs on the blouse. Also the jeans add a sharp color to the outfit. For shoe I chose these very comfortable peach pink Tory Burch flats, that also has gold detailing that goes perfect with the jeans. To finish everything off I added a metallic gold colored Rebecca Minkoff mini mac clutch with a gold chain for you to put the bag across your should.
Outfit #3: The next outfit is perfect when you are going the a party or are going out to a special fancy dinner. The most exciting part of the outfit, THE DRESS! I chose this coral color silk embellished evening gown, that is cinched at the waistline with gold detailing. With the perfect dress you need a pair of gorgeous shoes. I picked these amazing gold strap heels with a very high platform, to keep you feet comfortable. Adding more intelligence I chose a cream and gold colored clutch that is the perfect size for you night essentials.
Outfit #4: The final outfit is great for a lunch or diner date, it is more dressy but not as fancy as the last outfit. I chose a shier short sleeve, pastel pink blouse with a sparkle black sequinned collar. I would tuck the blouse into a lace black skater skirt. For this outfit I added some studded loafers or you can easily transform this outfit with a pair of black wedges. I like wedges a lot better than heels, because they are more comfortable and support your feet better as you walk. For a simple bag I added this Chanel inspires messenger bag with the black leather quilting and the gold and black cross body chain.
All these outfits can easily be recreated, if you click on the picture it will link you to a page with all the websites that you can find these items.
I hop everyone enjoyed this Valentine's Day outfits post, keep your eyes out for more of my Valentine's Day series, and I will talk to you next time. Byeeeeeeeee!!!!!!!!!!
Leave a comment below telling my with was you favorite outfit!
Saturday, January 19, 2013
How to Wear Peter Pan Collar Necklaces+DIY

Hey everyone sorry I haven't been posting lately I just have been really busy lately. I hope everyone is doing great in 2013 so far.
Today I'm going to be doing a how to wear peter pan collars with outfits and a DIY post, I'm going to show you how to make your own personalized peter pan collars. They are one of my favorite trends right now and lets just say I have a tiny obsession with them. The peter pan collar can spice up many outfits. They add a cute and sophisticated look to any outfit. With these collars you can make so many new outfits. A lot of shirts and blouses come with built is collars, but they can be a bit pricey. You can also dress these collars with dresses, down below I put together three different outfits that I spiced up with a peter pan collar.
 If you have a neutral plain color dress a sparkly or jeweled collar necklace would add a slash of color and life to your outfit. You can dress the collars up or down. Sometimes these collars could be a bit pricey, and not really found in stores. Most of them are sold online, but when I learned how to make them myself, I was really excited, because I could make the collar to match my outfits. They are really simple,fast and inexpensive to make. The total cost for me was about $10, and a collar online is about $20-$30.
Down below is a video teaching you how to make three different DIY peter pan collar necklace, by Ingrid or also known as missglamorazzi on YouTube. She is a beauty guru with wonderful beauty tips, she does amazing beauty video and vlogs I absolutely love her videos.
Ingrid's YouTube beauty channel link:
http://www.youtube.com/missglamorazzi
Ingrid's YouTube vlog channel:
http://www.youtube.com/thegridmonster
Link to the collar outline: http://www.sendspace.com/pro/r2c9h0
Thank you for reading, I hope everyone enjoyed this post, Follow for alerts on new posts!
Friday, January 4, 2013
Best of 2012 Tag

Hey everyone, Happy 2013!!!!! I can't 2013 is here already, 2012 passed by so fast. So today I'm going to do the best of 2012 tag. Explaining my favorite fashion pieces, beauty products, accessories and just random stuff.
During 2012 I've loved collared shirt, they are very trendy right now and can be paired with many things also the collars add an extra touch to the outfit. I love my sleeveless salmon colored top, especially the lace collar on it. Right now I'm really into skulls, I just think they are so edgy and fun. Like this white sweater, there are little gold skull all over the front, I like it's so pretty. Another fashion piece is my sleeveless denim vest. The denim vest has gold studs on the shoulders and the studs glam the look. The lace shorts are so girly and feminine look, they add so much to an ordinary outfit. Another piece that I've been loving is patterned leggings and pants, they add a pop of color to any outfit. they are so cute. For favorite shoes of 2012 are definitely my black studded Steve Madden combat boots and my cream colored lace Toms.
The boots are so edgy with the studs and the lace Toms are so girly, they both can be matched with so many things. They are totally different styles. 2012 was the year where I discovered a lot of my beauty products. My favorite eyeshadows has been the Smashbox "Limitless" Cream eyeshadows, they stay on for a long period of time and it looks you spend a lot of time. All you need to do is dab a little on your eye lid and blending it. For mascara I love the Maybelline Cat Eyes waterproof mascara. I makes your lashes so volumized and thick. My lips get really dried during the winter time and Maybelline's Baby Lips smoothing lip balm absolutely helps, it keeps nice and smooth and moisturized. Nail polish is my absolute favorite part, in 2012 that's when Essie came out with their winter collection with my favorite shade. I love the shades Mint Candy Apple and Very Berry Raspberry. Whenever I don't know what color to paint my nails I always go for these two. For favorite fragrances of 2012 I love the Taylor swift Enchanted Wonderstruck perfume and Marc by Marc Jacobs Daisy Perfume. Wonderstruck has a really sweet and fruity scent, while Daisy has a more classic scent.
The boots are so edgy with the studs and the lace Toms are so girly, they both can be matched with so many things. They are totally different styles. 2012 was the year where I discovered a lot of my beauty products. My favorite eyeshadows has been the Smashbox "Limitless" Cream eyeshadows, they stay on for a long period of time and it looks you spend a lot of time. All you need to do is dab a little on your eye lid and blending it. For mascara I love the Maybelline Cat Eyes waterproof mascara. I makes your lashes so volumized and thick. My lips get really dried during the winter time and Maybelline's Baby Lips smoothing lip balm absolutely helps, it keeps nice and smooth and moisturized. Nail polish is my absolute favorite part, in 2012 that's when Essie came out with their winter collection with my favorite shade. I love the shades Mint Candy Apple and Very Berry Raspberry. Whenever I don't know what color to paint my nails I always go for these two. For favorite fragrances of 2012 I love the Taylor swift Enchanted Wonderstruck perfume and Marc by Marc Jacobs Daisy Perfume. Wonderstruck has a really sweet and fruity scent, while Daisy has a more classic scent.
In 2012 I was really into more of gold colored jewelry, but I only have three favorites. My first one is a gold double layered necklace with two birds, it can go with so many outfits. Second I love spike bracelets and here I just have a gold stretchy bracelet. My last one isn't gold but they are these rope bracelets with little beads. I really like them because they look really bohemianism. Now on to total random favorites. My favorite ice creams has been the Starbucks Caramel Macchiato and Ben and Jerry's Chocolate Therapy. My favorite scent for 2012 had been Bath and Body Works Pumpkin Caramel Latte candle, the best scents combined pumpkins caramel and a latte. In 2012 I started to order Lemonade Passion Tea at Starbucks and I fell in love with them, it's and addiction guys. My last random favorite of 2012 has been macaroons and it was my first time trying them and I think maybe about March and they were unbelievable.
Favorite Songs of 2012
Little Things by One Direction
It's such a meaningful song for girls!
Lighting by Alex Groot
Discovered on Youtube
Favorite Movie
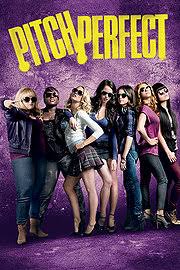
So these are all my favorites for 2012. Another great year has passed. I hope you enjoyed this post, see you next time!
Favorite Songs of 2012
Little Things by One Direction
It's such a meaningful song for girls!
Ronan by Taylor Swift
Discovered on Youtube
Favorite Movie
So these are all my favorites for 2012. Another great year has passed. I hope you enjoyed this post, see you next time!
Leave a comment below telling my you favorites!!!!!!!!!!!!!
Sunday, December 30, 2012


What I Got For Christmas 2012

Hey guys, so today I'm going to do a really quick post on what I received for Christmas this. I'm only doing this because it was requested by a viewer. But first I want to put a huge disclaimer out there, that I'm not trying to brag in any with way. Now that it's out there, let's get started! So I separated this into two categories, one category with what I was in my stoking and one category with the main presents.
What was in my Stoking:
- Coastal Scents mini Palette with 12 different colors
- Maybelline Bouncy Blush
- Maybelline Color Tattoo in the shade Bad to the Bronze
- Benefit Cream Eyeshadow / Liner
- Two EOS lip balms
- NARS Lip Lacquer
- Batiste Dry Shampoo
- Maybelline Great Lash Gel Mascara
- Maybelline Great Lash Very Black Mascara
- Maybelline Dream Fresh BB Cream
- Baby Lips Limited Edition Lip Balms
- Urban Decay Eyeshadow Primer
- Candy Canes
What was under the Christmas Tree:
- My parents got me Beats By Dr.Dre Solo HD headphones, the Marc
Jacobs Daisy perfume and the Urban Decay Naked 2 Palette
- My grandparents got me the Viva La Juicy perfume set and a Vera Bradley
mini Chain Bag
- My aunt got me a light blue pull-over from Victoria Secret's Pink, a black
One Direction Zip Up Sweatshirt and
- My other aunt and uncle got me an earring stand, necklace hanger and a three
stack ring holder
- My cousin Maggie gave me a dream catcher that she made and the Smashbox Photo Finish Foundation Primer
- My cousin Stacy got me the Bobby Brown Eyebrow Kit
- My cousin's girlfriend Simon got me a rhinestone horseshoe ring and a gold
black camera chain necklace
So that's all the things I got for Christmas, and I absolutely love and appreciate
everything that I got. Again I'm not trying to brag in any way
I hope everyone had a great holiday!
Leave a comment below telling me what you got.
Thursday, December 20, 2012
DIY Holiday Gifts
Hey pretties, five days until Christmas!
 1. glass jar with screw on lid (Costco)


Now that you have all your supplies, lets get started. First choose your small toys and place them on the inside of the lid, you can have so many different ones put together, know where you want them to go before gluing them on. All you need to do is apply you super glue to the bottom of the ornament and stink it on to the lid. after your done glue on all the ornaments, you just want to put that a side and let it dry.Then you want to fill the glass jar with your distilled water to about 2 inches from the top. Next add a dash of the gly-cerin to the distilled water. Now add the amount of glitter you would like. For the last step you want to put the lid with your figurines on it, and the lid as tight as possible to make sure no water gets out.

For the second gift we are going to make DIY decorated chalkboard mugs! I love doing this, because it's so fun to write on the mugs with the chalk. I mean who doesn't want a cup that you can write on.These are the supplies you will need, and where I got them.
1. a plain colored mug (Target)
2. painter's tape (Lowe's)
3. Pebeo Porcelain Chalkboard paint (Amazon)
4. soft paint brush (Michael's)
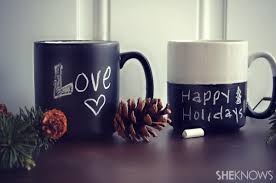
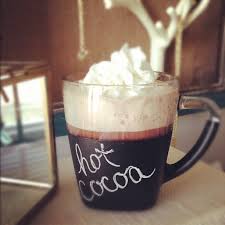 Lets get started. First make sure your mug is clean and dry. Use your painter's tape and section off the parts you don't want to have the chalk board. You can skip this step if you want to chalkboard your whole mug. Personally I like my cup to only have the chalkboard on only one section of the cup. After you section off your parts, you want to dip you brush in the Pebeo Porcelain Chalkboard paint and start painting. Beware that regular chalkboard paint won't work on mugs so be sure you get Pebeo Porcelain Chalkboard paint, also it must have baking instructions on it. After you are done painting, you want to remove the tape and let it dry for about 24 hours. After 24 hours you want to bake the mug in the oven at 400 degrees F, for about 30 minutes. After 30 minutes turn off the oven, let the cup slowly cool down in the oven until it's at room temperature. After you bake the mug it will be dishwasher and microwave safe.You can give this to a teacher or a co-worker with a pack of chalk and some packs of they're favorite coffee or tea.
I hope you guys enjoyed this DIY, and try it out.
Thanks for reading
Happy Holidays!
~Ruby
I am really excited, because today I am going to show you guys how to make different last minute DIY gifts.
For the first present we are going to make DIY snow globes. This present you can really play around with and make it special. These are the supplies you will need, and where I got them.
2. distilled water (Shop Rite)
3. gly-cerin (Michael's)
4. super glue (Home Depot)
5. glitter, color for your choice (Michael's)
6. any small plastic toys/ornaments (Joanne's)
4. super glue (Home Depot)
5. glitter, color for your choice (Michael's)
6. any small plastic toys/ornaments (Joanne's)
Now that you have all your supplies, lets get started. First choose your small toys and place them on the inside of the lid, you can have so many different ones put together, know where you want them to go before gluing them on. All you need to do is apply you super glue to the bottom of the ornament and stink it on to the lid. after your done glue on all the ornaments, you just want to put that a side and let it dry.Then you want to fill the glass jar with your distilled water to about 2 inches from the top. Next add a dash of the gly-cerin to the distilled water. Now add the amount of glitter you would like. For the last step you want to put the lid with your figurines on it, and the lid as tight as possible to make sure no water gets out.
For the second gift we are going to make DIY decorated chalkboard mugs! I love doing this, because it's so fun to write on the mugs with the chalk. I mean who doesn't want a cup that you can write on.These are the supplies you will need, and where I got them.
1. a plain colored mug (Target)
2. painter's tape (Lowe's)
3. Pebeo Porcelain Chalkboard paint (Amazon)
4. soft paint brush (Michael's)
I hope you guys enjoyed this DIY, and try it out.
Thanks for reading
Happy Holidays!
~Ruby
Subscribe to:
Posts (Atom)